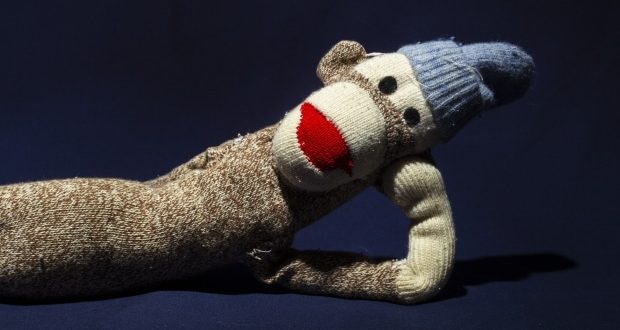
The sock monkey is a classic toy for kids and a great way to give new life to an old pair of cool socks! If you’re looking for an easy craft you can DIY with the little ones, you’re in the right place. Here’s how to make a sock monkey and everything you’ll need for this fun project.
What You’ll Need
You don’t need too much to jump right into making your sock monkey, but do make sure you have everything on hand before you get started. Set aside the following:
- One pair of socks for your monkey (a plain pair of socks is totally fine to use, but don’t be afraid to get creative with some wacky socks)
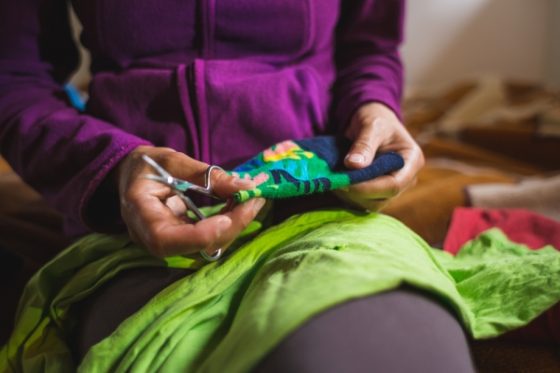
- A needle and thread to sew the little monkey together
- Chalk (if the sock is dark) or magic marker (if the sock is light) to define where to cut and sew
- Sewing scissors to define the different pieces of the sock monkey’s body
- Polyfill (or more old socks) to fill out the body
- Googly eyes and glue or buttons to be the eyes on the face
Even though you don’t necessarily need one, if you want to use a pattern to help determine where to cut and sew, there are many digital options you can download online.
Steps for Making a Sock Monkey
Making a sock monkey is simple but does require a bit of patience. Take it step by step, and know the end result will be so cute!
1. Layout the Socks to get them Ready for Sewing and Cutting
Start by flipping each of your cool socks inside out then by laying them out on the floor or table. One sock should have the whole front of the toe facing the ground with the heel facing up. The other should have the toe pointing to the side like a holiday stocking you hang on the mantle.
You might have run them over with the iron a bit to make them sit flat. Set aside the sock that’s in the stocking position.
2. Draw a Line down the Center of the Sock that’s Heel-up, then Sew on either Side
You’re about to make the sock monkey’s legs! Using your chalk or marker, draw a straight line down the middle of this sock, starting at the elastic ankle to just underneath the folded heel. Then, take your needle and thread, and sew a line of stitches about ¼ inch to the left of the line and about ¼ inch to the right of the line.
Stitch the gap of the elastic on each side closed to make the leg fully take shape. You can sew another line of stitches in a zig-zag shape to reinforce them. If you aren’t familiar with sewing, you can find ample articles online and videos on YouTube.
Once you have created these two new seams, use your scissors to cut along the line you drew earlier. Be sure not to cut all the way up the sock; otherwise, you’ll cut it right in half! You should be able to see the legs have taken form. There will also be an opening between the two legs; you’ll need to use that later!
3. Sketch out the Pattern for the Monkey’s Ears, Tail, and Arms, then Sew along the Lines
Following the process you started with the sock monkey’s legs, you’ll create the rest of his little body parts. Draw three lines on the long part of the sock (the part that goes around your ankle and calves) to make the tail and arms; the middle line should be thicker than the outer two.
The front part of the sock (from the toe to the top of the elastic) will form the tail, then the other two will be the arms. In the space between the toe and the heel, draw two loops — they’ll become the ears.
Just like you did with the other sock, sew around the lines you drew, then reinforce that line you sewed with another round of zig-zag stitches. Once those stitches are complete, you can then cut along the lines you drew. Cut out the heel of this sock to make the mouth later, and also a triangle between the “tail” and the heel (around where you cut out the ears).
4. Assemble the Legs and Body of the Sock Monkey
Now you have all of the parts you need, it’s time to put them all together to make your fun new toy! Remember that little hole in the sock that has the legs and body of your sock monkey? Use it to flip the sock right side out and then use your polyfill or other socks to stuff all three parts. Sew the little hole closed. Now, flip the tail, arms, and ears right side out and stuff those, too.
5. Put all the Pieces Together as your Sock Monkey takes form.
The heel you set aside before becomes the mouth for your sock monkey…right now! Add a little bit of filler to give your mouth some shape, then sew it to the front of the body. You can stitch the front of the mouth to give it a little smile.
Follow with the ears; sew them to either side of the sock monkey’s face. Next, sew or glue on the eyes. If you’re using googly eyes, a little fabric glue should work; if you’re using buttons, stitch them a few times over so they’re secure. Last, but not least, sew on the arms and the tail. You did it!
Snuggle Your Sock Monkey
There are many things you can do with a pair of cool socks, but one of the most fun ways you can repurpose them is to make a sock monkey. Not only is it something your little ones will love to play with now, but it’s also something they’ll enjoy passing on to their own children later.
Building a pillow fort is a great way to bond with your kids. Follow these simple steps on how to build an epic pillow fort.
![]()